Snippets
Snippets are pieces of code that you can use in multiple dashboards. Snippets are globals to your organization. They are created in the Admin section.
There are three types of snippets:
- Custom Widgets : to be used for custom widget code (and also in KPI widgets with custom HTML mode). This type of snippets is also referred as Components.
- CSS : to be used in the dashboard CSS section
- Headers: to be used in dashboard headers with custom HTML mode
Using a snippet in a dashboard
In any "code" section of a dashboard (either CSS, custom html Header, custom widget...), you can retrieve a snippet
using the syntax {{snippet::SNIPPET_NAME}}.
For example, if you create a snippet named my_custom_header_v1, you can use it in your custom HTML
section with {{snippet::my_custom_header_v1}}.
The syntax is the same to use a CSS or a Header snippet.
Using variables in snippets
Before being rendered, each snippet is interpreted. This means you can retrieve dashboard variables and use functions in snippets.
To insert interpreted code in a snippet, use double curly brackets: {{here is my code}}.
For example, let's say you have defined a global variable client_name in your dashboard global variables:
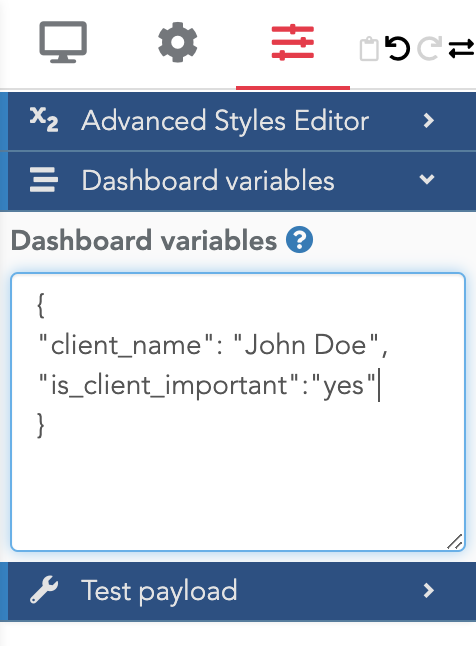
You can use it in a snippet using the following code:
<div>
    Hello {{client_name}} !!!
</div>
You can use all the features of our interpreter, such as the functions defined here.
One of the most useful feature is the conditional test: {{condition ? val_if_true : val_if_false}}. This is used in
the below section to apply a conditional style.
Using variables modified dynamically by the user in a filter
In the above example, the variables are defined statically in the Dashboard Variables section of a dashboard.
But of course, you can use variables modified dynamically by the user in a dynamic filter.
See here for details about creating
such variables.
Conditional styling
Using variables in snippets, you can apply a style according to a condition computed on the variables. Here are a few examples.
Example 1: Conditional CSS classes in a header snippet
Here is a full example that emphasizes the client name if it is marked as important in your dashboard variable:
<div class='header_main_class {{(is_client_important=="yes" ? "important_client":"")}}'>
    Hello {{client_name}} !!
</div>
In this example:
header_main_classis a class defined in your dashboard CSS. Because it is used in a snippet, it's a good practice to also define it in a snippet (with the type CSS) and to import it in your dashboard's CSS section.important_clientis another CSS classis_client_importantis a dashboard variableclient_nameis another dashboard variable
For example, you can use this CSS snippet:
.header_main_class{
    font-size: 20px
}

.important_client {
    color: red;
}
Quotes matter
In the above example, you have both single quotes ' and doubles quotes ". In our interpreter, strings
must be provided within doubles quotes. In HTML, both class="c1 c2" and class='c1 c2' are valid. But because the
double quotes are used within the interpreted section, we use single quotes to encapsulates
the full string defining the list of classes (i.e. class='header_main_class {{interpreted code using double quotes}}').
Example 2: Hiding or showing a html block using CSS
Let's say that in the above example, you want to completely remove the div block if the client is not important.
Do do that, create a new CSS class named hidden_block in your CSS snippet:
.hidden_block{
    display: none
}
And use this HTML snippet instead of the previous one:
<div class='header_main_class {{(is_client_important=="yes" ? "important_client":"hidden_block")}}'>
    Hello {{client_name}} !!
</div>
If the variable is_client_important is not "yes", then the class hidden_block will be used, and the full
div block will be hidden.
Example 3: Conditional style without CSS classes
Another option to apply a conditional style is to compute the condition directly on the style anchor in your HTML code.
The main benefit
is that other users using your snippet in their dashboards won't need to import any CSS file.
This approach is more encapsulated (and thus easier to use).
For example, using the previous example, you can write:
<div style='font-size:24px;background-color:{{is_client_important=="yes" ? "red":"green"}}'>
    Hello {{client_name}} !!
</div>
Functions to create dynamic components
We say that an HTML component is dynamic when it reacts to users' clicks. Serenytics provides several functions that you can use in your snippets to achieve this:
srnSetVariableValue()srnToogleValueInList()srnLogout()srnDownloadSourceData()
These functions can be triggered using the html onclick parameter, for example:
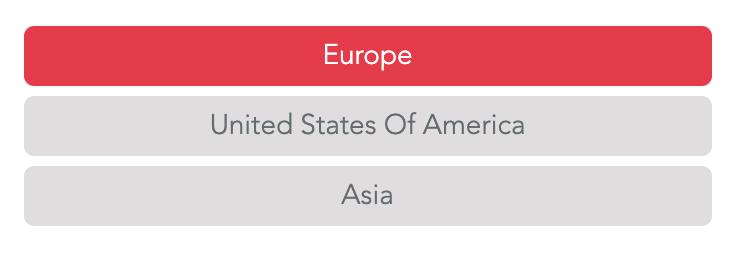
<div onclick='srnSetVariableValue("varCountry", "Europe")'>
    Europe
</div>
srnSetVariableValue(varName, value)
Use this function to set the value of a variable.
For example, let's create the widget below to select a region/country:
The underlying variable is named varCountry. We initialize it with the value Europe in the dashboard variable JSON.
Here is the snippet code to use:
<div>
    <div class='filter_entry {{varCountry=="Europe"? "entry_selected":"entry_not_selected"}}'
        onclick='srnSetVariableValue("varCountry", "Europe")'>
        Europe
    </div>
    <div class='filter_entry {{varCountry=="USA"? "entry_selected":"entry_not_selected"}}'
        onclick='srnSetVariableValue("varCountry", "USA")'>
        United States Of America
    </div>
    <div class='filter_entry {{varCountry=="Asia"? "entry_selected":"entry_not_selected"}}'
        onclick='srnSetVariableValue("varCountry", "Asia")'>
        Asia
    </div>
</div>
And in your CSS (ideally within a snippet used in your dashboard, but it also works if you define it directly in the dashboard's CSS), you can specify :
.filter_entry {
    margin:5px;
    padding:5px;
    background-color: #f3f3f3;

    border-radius:5px;
    transition: all 0.2s;
    text-align:center;
    cursor: pointer;
}

.entry_not_selected {
    background-color: #f3f3f3;
}

.entry_not_selected:hover {
    background-color:#dfdddd;
}

.entry_selected {
    background-color: #e63946;
    color: white;
}
You can now use the variable varCountry to filter widgets in your dashboard, for example in a static filter
using country == {{varCountry}}.
Have the buttons on the same row instead of one above each other
Use the flex display style (see this tutorial) to set the layout of your buttons. See the first row of the modified code below:
<div style="display:flex">
    <div class='filter_entry {{varCountry=="Europe"? "entry_selected":"entry_not_selected"}}'
        onclick='srnSetVariableValue("varCountry", "Europe")'>
        Europe
    </div>
    <div class='filter_entry {{varCountry=="USA"? "entry_selected":"entry_not_selected"}}'
        onclick='srnSetVariableValue("varCountry", "USA")'>
        United States Of America
    </div>
    <div class='filter_entry {{varCountry=="Asia"? "entry_selected":"entry_not_selected"}}'
        onclick='srnSetVariableValue("varCountry", "Asia")'>
        Asia
    </div>
</div>
srnToogleValueInList()
Let's say you want to use the same widget as in the above example, but you want to give the possibility for the user
to select several values. In this case, the variable must be a list. Let's name it myCountries in this example.
First, you need to initialize this variable as a list in the dashboard variables:
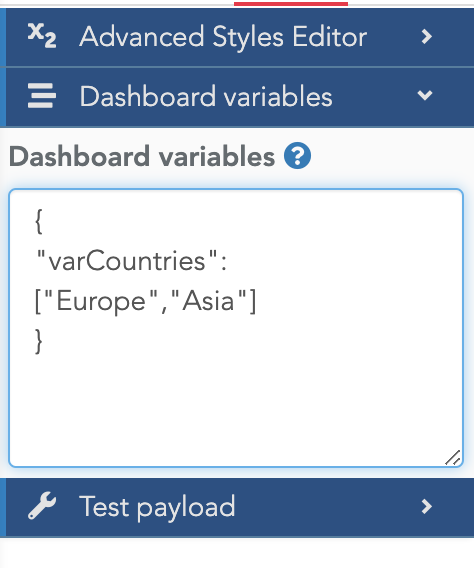
Of course, you could initialize it with an empty list [].
And here is the widget code:
<div>
    <div class='filter_entry {{variableIncludes("varCountries","Europe")? "entry_selected":"entry_not_selected"}}'
            onclick='srnToogleValueInList("varCountries", "Europe")'>
        Europe
    </div>
    <div class='filter_entry {{variableIncludes("varCountries","USA") ? "entry_selected":"entry_not_selected"}}'
            onclick='srnToogleValueInList("varCountries", "USA")'>
        United States Of America
    </div>
    <div class='filter_entry {{variableIncludes("varCountries","Asia") ? "entry_selected":"entry_not_selected"}}'
            onclick='srnToogleValueInList("varCountries", "Asia")'>
        Asia
    </div>
</div>
The function srnToogleValueInList() is used to toogle values in the variable named myCountries.
To detect if a list contains a value or not, Serenytics provides the function variableIncludes().
Tip
To customize a widget's layout (e.g. to span filter entries horizontaly), we advise you to use Flexbox. Here is a very good guide: Guide to Flexbox.
srnLogout()
This function can be used to create a custom logout button, e.g.:
<div onclick="srnLogout()">
    LOGOUT SERENYTICS
</div>
Pass data to a component
Get data from a datasource within a component
Often, you want to pass data to a component to display it. For example, let's say you want to create the dashboard below:
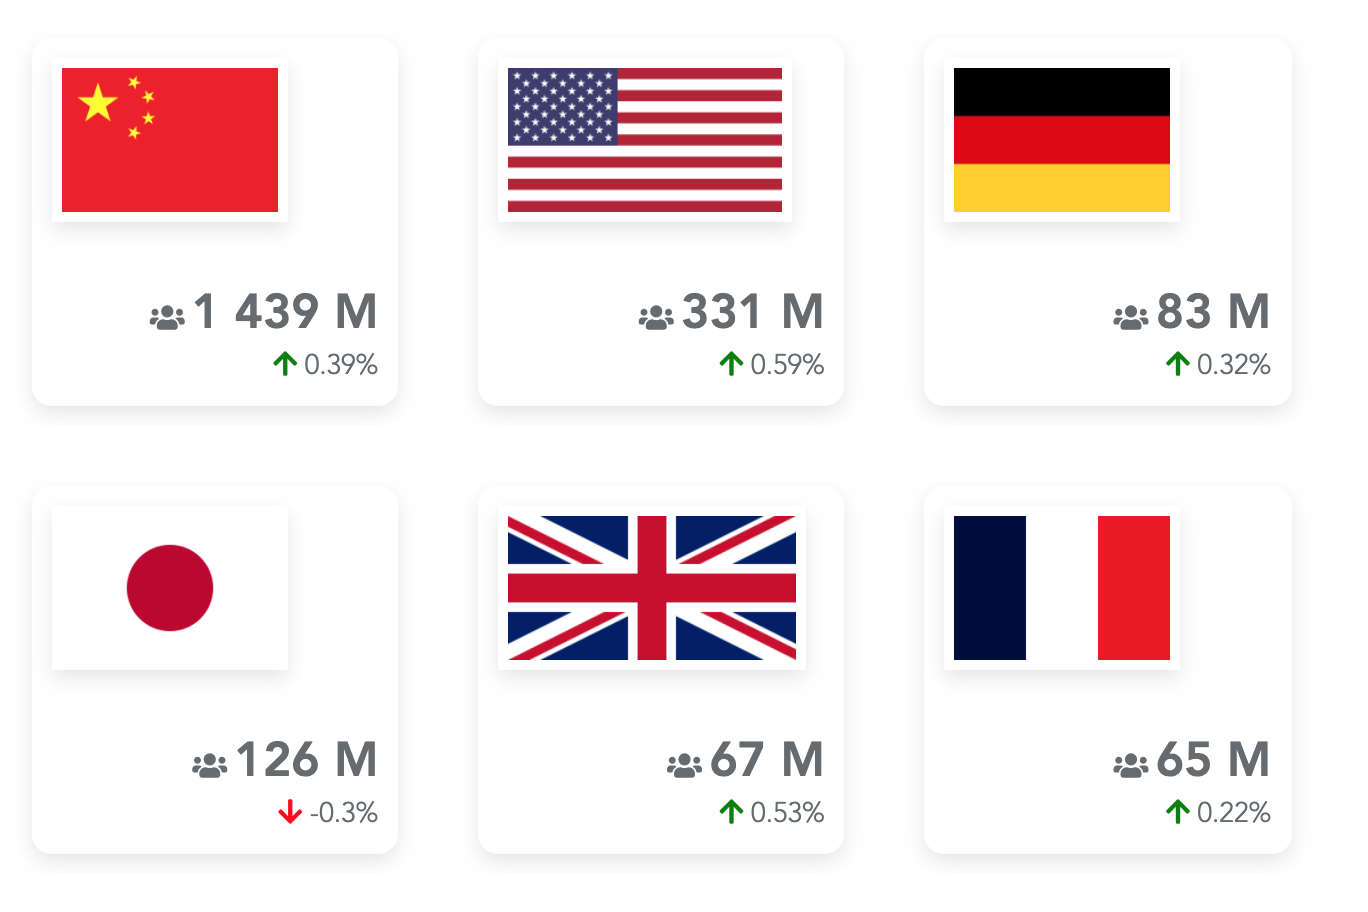
In this dashboard, each KPI is a custom widget, showing for a given country: its flag, its population and the variation of its population last year.
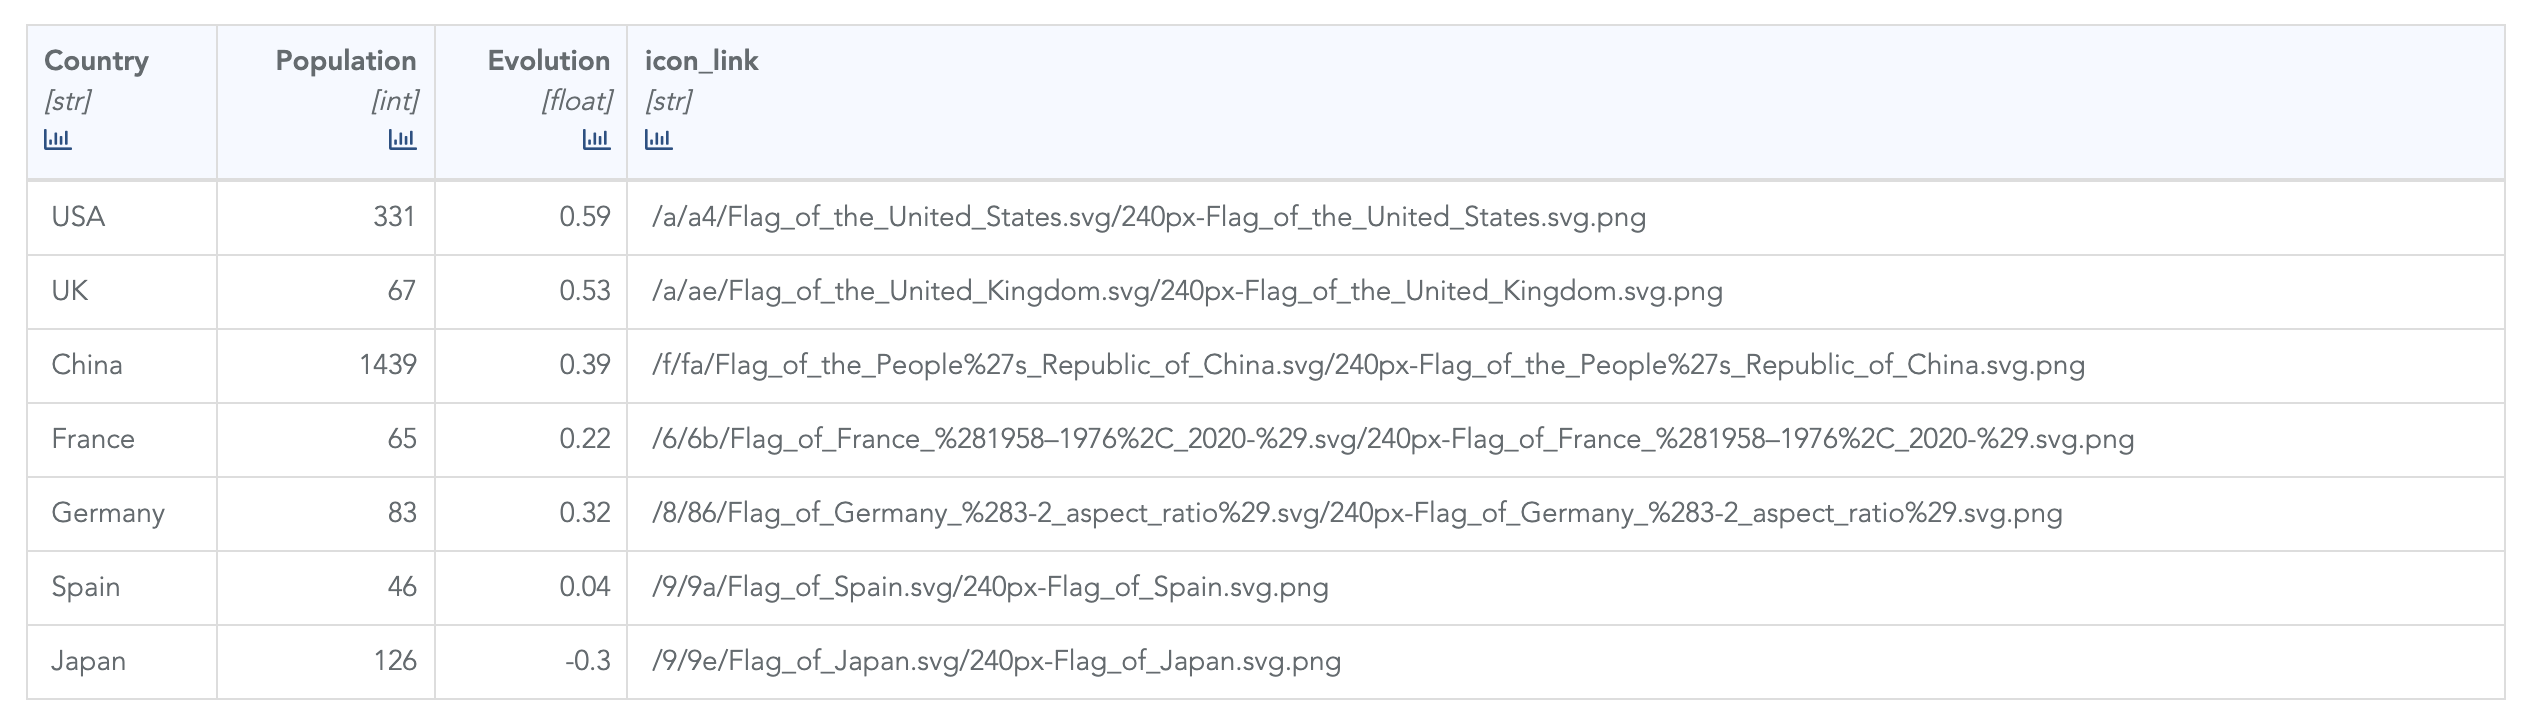
The fist step to achieve this dashboard is to upload the data. In our case, we uploaded this : csv_file in a CSV data source:
Then we create the HTML snippet below (we name it country_card):
<div class="outer_card_container">
    <div class="card_container">
        <div class="flag_container">
            <img class="flag_img"
            src=https://upload.wikimedia.org/wikipedia/commons/thumb{{value4}}>
        </div>
        <div class="value_container">
            <div class="population_container">
                <span class="fa fa-users"></span>
                <span class="population_value_container">{{formatNumeral(value2,"1 000")}} M </span>
            </div>
            <div class="evolution_container">
                <span class="fa fa-arrow-up" style='display:{{value3>0 ?"inline":"none"}}; color:green'></span>
                <span class="fa fa-arrow-down" style='display:{{value3<0 ?"inline":"none"}}; color:red'></span>
                {{value3}}%
            </div>
        </div>
    </div>
</div>
In this code:
value2,value3,value4are data variables configured in the widget on the dashboard and passed to this component. They receive the values obtained from the data query.value2contains the country's populationvalue3contains the evolution of this population (as a float number)value4is the part of the URL leading to the flag image for this country
And here is the CSS we use:
.outer_card_container {
    padding:10px;
    height:100%;
    width:100%;
}

.card_container{
    background-color:white;

    padding:10px;

    box-shadow: 0 0.4rem 1rem #e6e6e6;
    border-radius:10px;
    height:100%;

    display:flex;
    flex-direction:column;
    justify-content:space-between;
}

.flag_container{
    max-height:50%;
}

.flag_img {
    max-height:100%;
    max-width:100%;
    padding:5px;
    height:100%;
    width:auto;
    padding:5px;

    box-shadow: 0 0.4rem 1rem #e6e6e6;
    object-fit:contain;
}

.value_container{
    text-align:right;
}

.population_value_container{
    font-size: 24px;
    font-weight:600;
}
To use this component in a dashboard, the first step is to create a KPI widget, and configure its data settings:
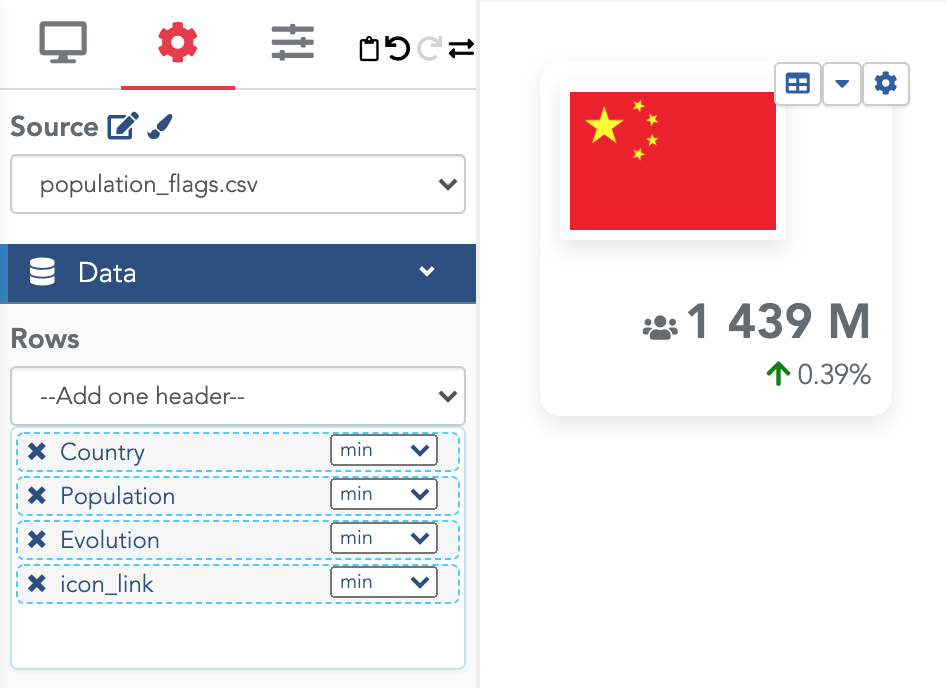
Using this configuration, the variable value1 contains the Country name, value2 its population, value3 the
evolution of its population and value4 the missing part to build the flag image URL.
We also need to filter the rows to keep only the row corresponding to a single country (as we show one country per widget):

Then, in the Rendering section, select the Custom HTML template and enter {{snippet::country_card}}.
To create other cards, you just have to copy/paste the widget and edit the filter section to select a new country.
Another option would be to let the user select the country in a dynamic filter, store the selected value in a variable and use it to filter this widget.
Pass static parameters to a component
Let's say you want to emphasize the population for some countries in the previous example.
Of course, you can add a new column in the datasource and use the principle above to pass it to the component (as
a value5 parameter).
But a simpler option is to pass parameters directly to the component. This is possible using the syntax
{{snippet::mySnippet(myParam1=value1, myOtherParam=value2,...)
Note that when providing parameters, the default parameters obtained from the data query (value1, value2...)
are not anymore passed automatically to the component. You need to pass them manually.
In our example, that would be:
{{snippet::country_card(value1=value1, value2=value2, value3=value3, value4=value4, emphasize="yes")}}
And the modified snippet is:
<div class="outer_card_container">
    <div class="card_container">
        <div class="flag_container">
            <img class="flag_img"
            src=https://upload.wikimedia.org/wikipedia/commons/thumb{{value4}}>
        </div>
        <div class="value_container">
            <div class="population_container">
                <span class="fa fa-users"></span>
                <span class="population_value_container"
                      style='color:{{emphasize=="yes"?"red":"inherit"}}'>
                    {{formatNumeral(value2,"1 000")}} M
                </span>
            </div>
            <div class="evolution_container">
                <span class="fa fa-arrow-up" style='display:{{value3>0 ?"inline":"none"}}; color:green'></span>
                <span class="fa fa-arrow-down" style='display:{{value3<0 ?"inline":"none"}}; color:red'></span>
                {{value3}}%
            </div>
        </div>
    </div>
</div>
Here, we added the part style='color:{{emphasize=="yes"?"red":"inherit}}' to emphasize the value if required.
Using data attached to the logged user in a snippet
You can retrieve the logged username (i.e. its email) using the syntax $$login.username$$. And you can also
retrieve any user's metadata field using the syntax $$login.metadata_field_name$$.
For example, you can define a user's metadata with a business_unit field:
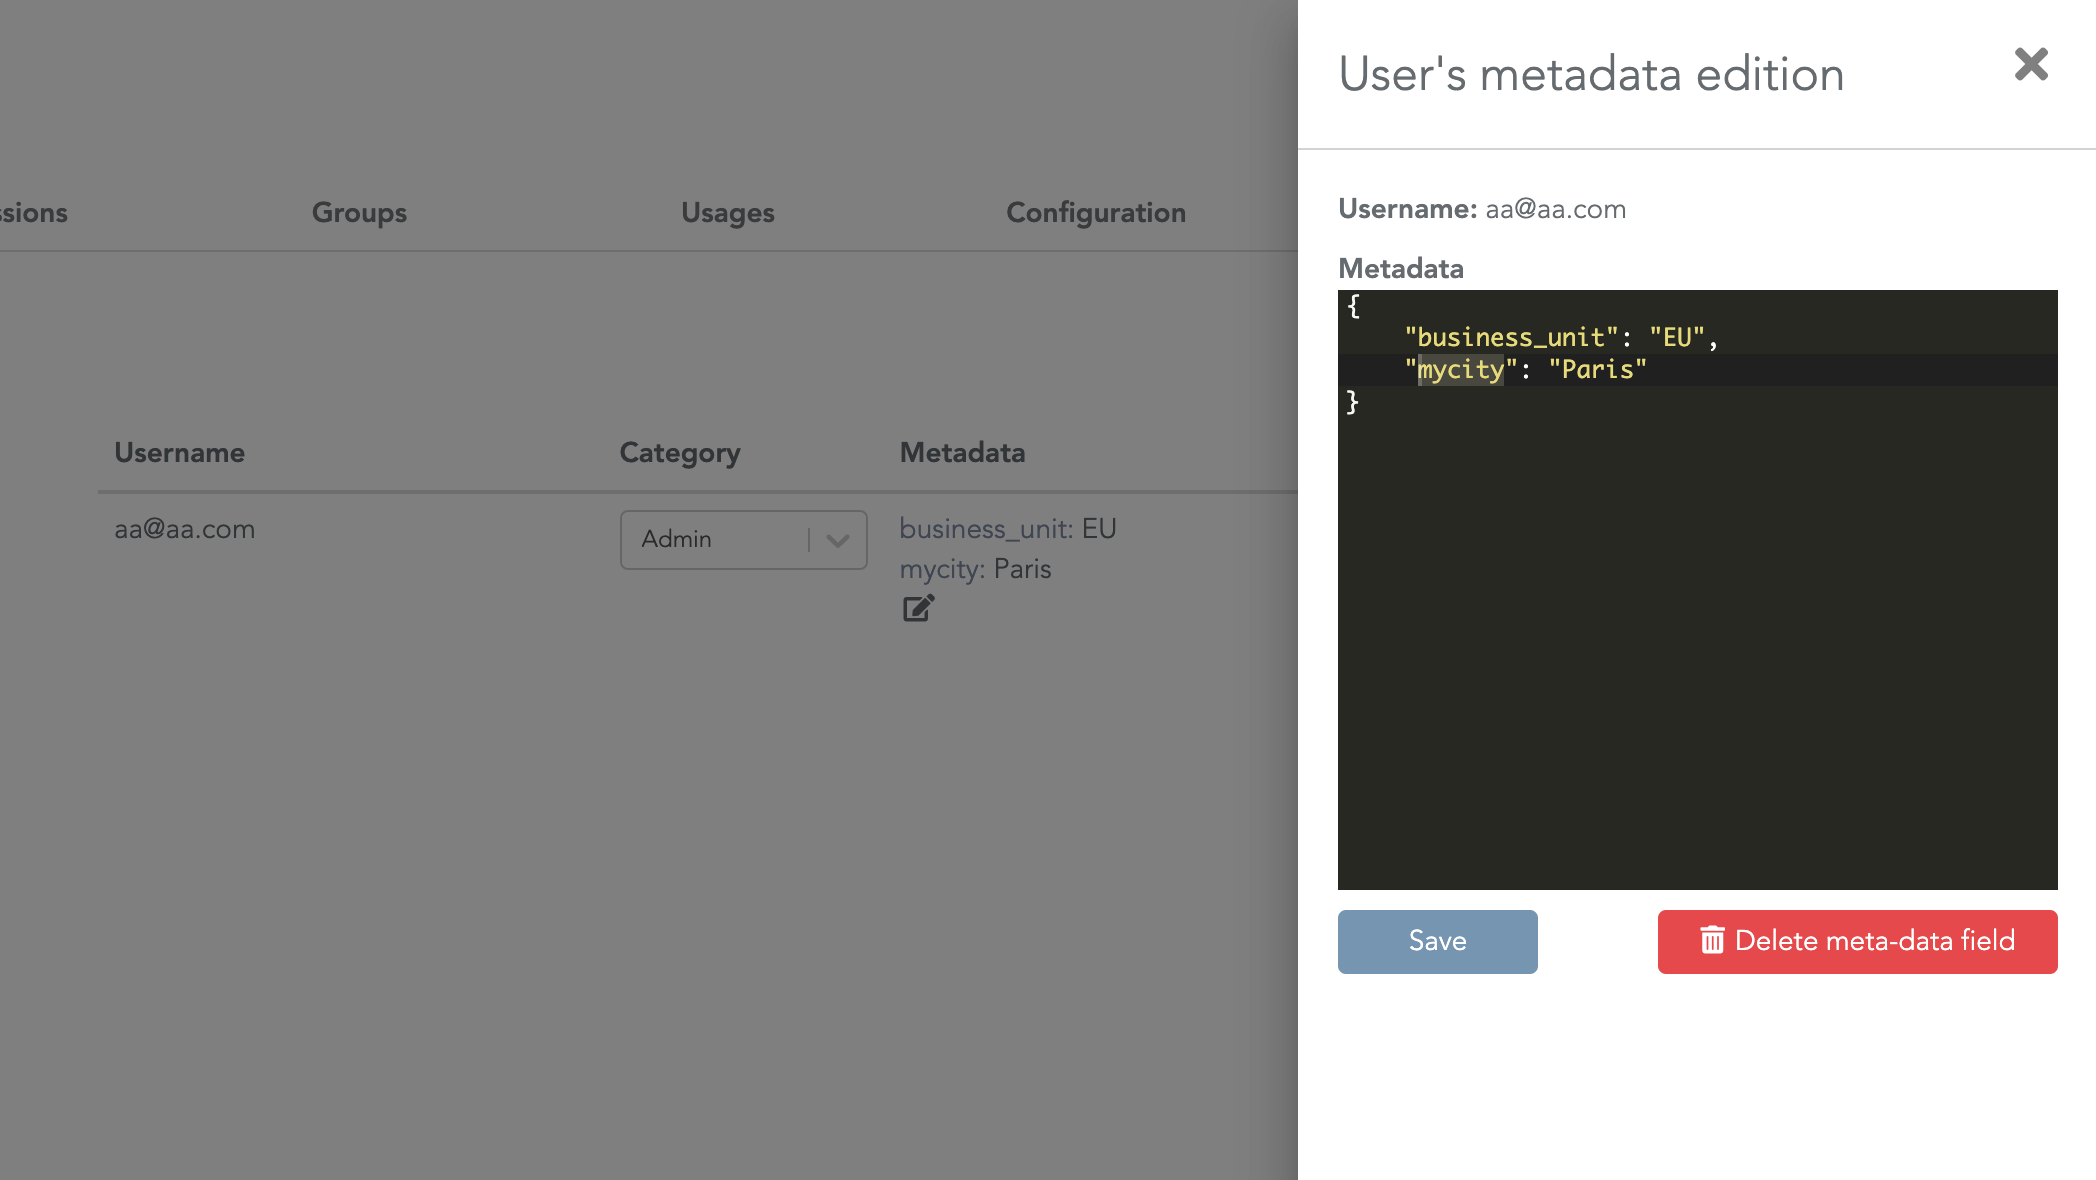
Then, you can create a snippet to show the username and its business unit:
<div>
    <div>
        Username: {{$$login.username$$}}
    </div>
    <div>
        Business unit: {{$$login.business_unit$$}}
    </div>
</div>
Of course, you could also use a user's metadata field to show/hide some data:
<div>
    <div style='display:{{$$login.access_data$$=="yes" ? "block":"none"}}'>
        You can see the data.
    </div>

    <div style='display:{{$$login.access_data$$!="yes" ? "block":"none"}}; color: red'>
        You are not allowed to see this data!
    </div>
</div>