Template dashboards
A template dashboard is a dashboard that requires some variables to be filled dynamically (i.e. passed to the dashboard when it has to be rendered). These variables are used to filter the content of the dashboard. This is also the type of dashboard that you can embed in your app.
For example, you can create a template dashboard for your sales team with a variable that indicates the sales representative who is viewing the dashboard. The dashboard will let him see only its sales.
This is also useful to create a dashboard and embed it in your application, and display data related only to the user connnected in your application.
In the dashboard editor, such a variable is declared in the 'Global Filter' section, using the {{my_variable}} format.
If a global filter is declared, the dashboard is said to be a template dashboard. You have to define the value of this
variable to display the dashboard. There are several ways to pass the values of this variables (we call it the payload)
to the dashboard:
- In the URL of the dashboard
- Through a secure token obtained by a backend (that's the best option to embed a dashboard within your application)
- As meta-data of each login
- As a payload passed to the API when generating a PDF report to be sent by email
Create a template dashboard
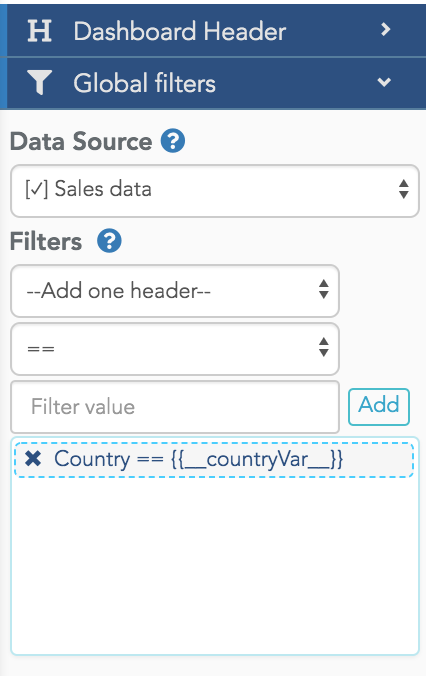
To create a template dashboard, you need to add a global filter to a given dashboard. In the capture below,
we created a global filter on the field country, with the operator ==, and the variable name is __countryVar__.
The {{ and }} are used to specify to our engine that this is a template variable that must be interpreted, and not
a standard string.
When you add this filter, the widgets of the dashboard using this datasource will display an error message:

To first test your dashboard with variables, instead of dynamically passing these variables, you can start by using a "test" payload defined in the dashboard. Once your dashboard is working with a test payload, you can implement the dynamic payload.
Using a test payload to pass variables

With this test payload defined, our engine knows the value to use for the variable __countryVar__ and the widgets can
filter the data accordingly. This test payload is a useful tool to use when designing a template dashboard. But
when you load the URL https://app.serenytics.com/viewer/webapps/DASHBOARD_UUID (i.e. when you load
the dashboard in the viewer app), the test payload is not integrated.
It's only available for test and design purpose within the studio. To have it available in the viewer app, you need to
dynamically pass a payload to the dashboard (see section just below).
Section Dashboard variables
There is a section called "Dashboard variables" just below the section to create static filters. This field
can be used to hard-code variables values in a dashboard (and use them exactly as described above with the
{{myVar}} syntax). This is useful to statically filter several datasources on a single value. This value can be
defined once in this field instead of copying it in every static filter.
Using dashboard variables to define default values for payload variables
When a variable value is provided by both the dashboard variables section and the dynamic payload, our engine will use the value from the dynamic payload.
This can be used to define a default value for a given variable by adding the default value in the dashboard variables section. If the dynamic payload does not provide this variable, our engine will use the default value provided in the dashboard variables section. If the dynamic payload provides it, our engine will use this value.
Dynamically passing a payload to a dashboard
In the next two paragraphs, you'll find two ways to create the payload outside our studio and pass it to the dashboard viewer.
Query-string mode is a quick mode for tests or public data. Backend mode is the secure way to pass variables to a dashboard when you need to embed it in your app.
Query-string mode
In this first mode, in order to specify the payload to the viewer, you must pass the payload as a base64 parameter in
the URL: https://app.serenytics.com/viewer/webapps/DASHBOARD_UUID?embeddedPayload=BASE64-PAYLOAD
See the example below for a javascript or python code to create the encoded base64 payload:
// Javascript code

var payload={
    __countryVar__: "US"
}
var embeddedPayload = btoa(JSON.stringify(payload))
# python code

import base64
import json

payload = {
  '__countryVar__': 'US'
}
embeddedPayload = base64.b64encode(json.dumps(payload).encode('utf-8'))
This method is very simple but is not safe, and thus it can be used only by the owner of the dashboard unless the dashboard is shared as "public".
Share your dashboard as "embedded" and use the back-end mode for a secure embedding.
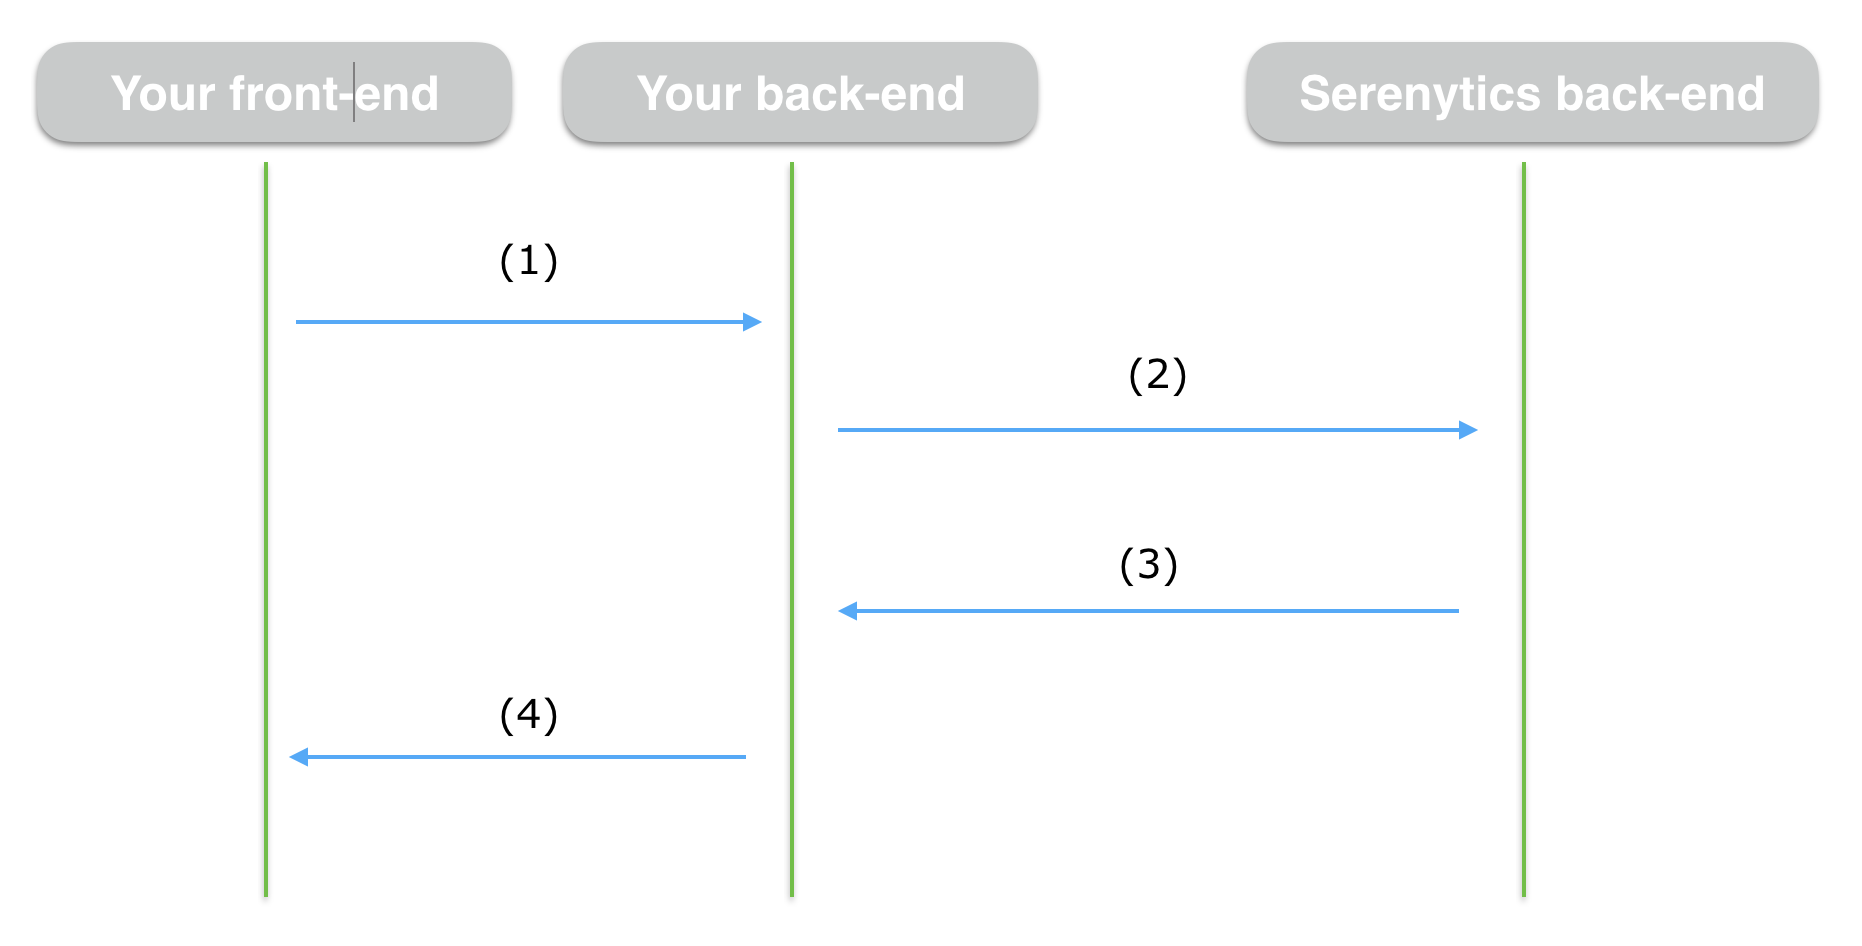
Back-end mode
To secure the template dashboard embedding process, you need to safely obtain a dynamic URL of the dashboard (configured with the payload) from your back-end.
This URL can be obtained from a POST to the URL:
/api/web_app/DASHBOARD_UUID/embed.
See here to get all details about this API route (parameters and security options) and code examples.
Because you need to pass your API key to get authenticated for this URL, you must call this URL from a code not visible by your users (i.e. your back-end).
It will return a JSON with a field embeddedUrl. This URL is the URL to use to safely display the dashboard to your
users (it already contains a safe token encoding the payload).
This URL is unique and can only be used once, so a hacker cannot extract it and share it.
Example flow of secure embedding
Let say you want a user to access a Serenytics dashboard but you want him to only have access to the data of its business unit.
Here is the flow to achieve that:
-
In your front-end, when the user loads the page where to embed the dashboard: call an API route on your back-end to get the dashboard URL. This route is a new one you need to create in your back-end (e.g. you can name it get_serenytics_dashboard_url). Of course, your user needs to be authenticated to your system to be allowed to call this API.
-
In the code of this API (in your back-end), you know which user (from your system) did the call. You can extract its business unit from your database. Then call the
/api/web_app/DASHBOARD_UUID/embedAPI passing it the user's business unit. -
You receive (in your back-end) the result from the
/api/web_app/DASHBOARD_UUID/embedAPI. It contains a fieldembeddedUrlwhich is a unique URL. -
You answer to your front-end (as the answer of step 1) passing it the field
embeddedUrl. -
You display the
embeddedUrlin an iFrame (see iFrame embedding documentation).
This is secure because:
-
the API
/api/web_app/DASHBOARD_UUID/embedrequires your Serenytics API key, and you call it from your back-end so your user has no access to your Serenytics API key -
the
embeddedUrlreturned by the Serenytics API contains only a secure id and not all the payload used to filter the data like in the query string mode. In this mode, the secure id lets us retrieve the corresponding filtering payload inside the Serenytics back-end when a data request is made from the embedded dashboard. The filters are applied directly inside the Serenytics backend and thus cannot be modified by your user. -
the
embeddedUrlcan only be opened once (if configured in the embed API call). So once it is opened in the iFrame in your app, this URL cannot be opened again. You need to generate a new dynamic URL.
With this flow, your user can't forge an URL to get data from another business unit, neither reuse this URL later.
Note that you must repeat this process each time the user wants to display the dashboard (because the provided URL has an expiration date and can be used only once).
Using the in operator
When using the in operator in the filter:
- if the type of the filtered column is
datetime, the value must be a string (e.g."month(0)"). - else, the value can be:
- a list, for example:
["USA", "France"] - the special string
"$$all$$"that will not apply any filter (i.e. return all data).
- a list, for example:
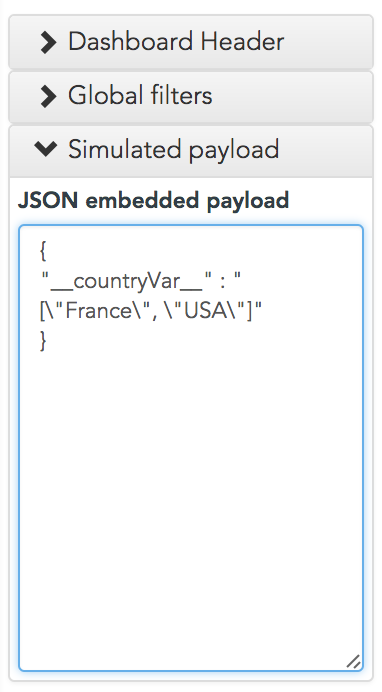
Here is an example to filter with two countries (when using the Serenytics editor to simulate the payload, quotes inside filter value must be escaped):
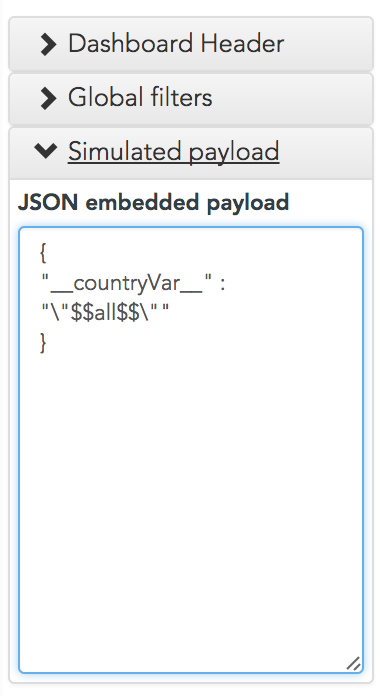
Here is another example to use the "$$all$$" keyword in our interface:
Using the payload within a formula
For advanced needs, you can use values passed by the payload inside formulas. In this case, please note that the formula
preview is not working and will always display an Incorrect filtering error.
Here is an example:
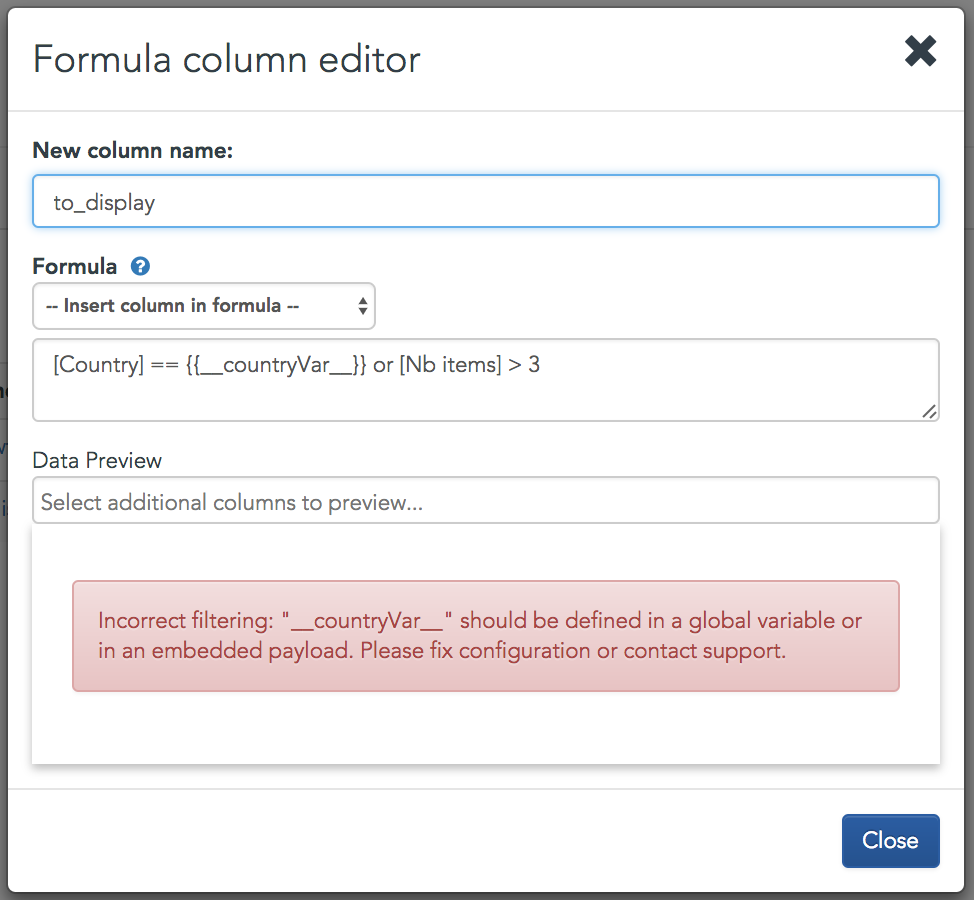
In the dashboard, this formula can be tested with the operator is_true.
Filtering dashboard data based on logged in user
It's also possible to use variables based on logged in user inside global dynfilters. For this, you don't need to embed Serenytics inside your page nor develop any code. You only need to have data containing one row by user of your Serenytics organization.
Loading metadata for each user
Create a new data source with your data by user (it can be any kind of source, for instance a CSV or a SQL server). The
first column must be named login and its values must correspond to the username of the users of your organization in
Serenytics.
Then create a task "Reload user metadata" in the automations section and select the newly created data source. Run the task and you're ready to filter data based on who is viewing your dashboard.
Using user metadata in global filters
Instead of defining a filter such as before country == {{__country_var__}}, you can now use the $$login.variable$$
syntax to filter on user based values. For instance using the same example as previously:
country == $$login.country$$
if country was a column of the data source you created previously.
Send template dashboards PDF by email
See the option dashboard_payload in the python client function
send_email.
Global static filters configuration
When your dashboard is in embedded sharing mode, in the Global Filters section, you can choose where those filters
are applied.
This option is named Embedded security: apply global static filters in frontend instead of backend (less secure).
When this option is enabled (default mode), the global static filters are applied in the frontend (i.e. in the
browser). A hacker can intercept the REST API query for a given widget and modify the filter content (ie. the where
condition).
To make it more secure, you can disable this option. In this case, the filters will be applied in the backend. When our backend receives a REST API data query, it will add to it the global static filters defined in the dashboard. This is more secure because even if a hacker in the Viewer manually modifies the data query, the filters will still be applied in the backend. But pay attention that when this option is enabled, a dynamic variable cannot be used in the global static variable. For example, a variable attached to a dynamic filter will not be used by the query when the user modifies it.