Filtering data
There are several ways to filter data rendered in a dashboard:
- Static filter in a widget: this lets you define a filter in a single widget. The viewer can't modify the filter. You can define several static filters in a widget.
- Dynamic filter in a widget: this lets you define an editable filter in a widget. The viewer will be able to use it to filter the data displayed in the widget. You can add several dynamic filters per widget.
- Dynamic filter widget: this is a particular widget used to encapsulate dynamic filters applied to a full tab. A viewer can use this filter widget to filter the data of a given tab.
- Global static filter: used to define a filter on a datasource in a dashboard. This filter will be applied to all widgets using this datasource in all the tabs of the dashboard. The value used in a global static filter can be defined in the dashboard. But it can also be passed dynamically to the dashboard. In this second case, the dashboard is called a template dashboard. See here for the documentation about this option.
Static filter in a widget
In the Filter section of a widget configuration, to define a filter, you need to select the dimension, operator and value.
Using date/time filters
For date/time dimension, you can use special filters: the same as in data sources formulas.
Using In/Not in filters
When using the In operator, you must provide a list of string or integer values.
Examples:
- filtering specific ids:
[42, 567, 4095]
- filtering specific quarters:
["Q1", "Q3"]
When you are using a dashboard template, you can use the special value "$$all$$" in In filters payloads to provide
an admin dashboard with all the data.
Dynamic filter modes to get the list of possible values
When you create a dynamic filter, this filter must query the data to know which values must be displayed. And the labels displayed in the filter are the values obtained by the query.
For example, if you create a dynamic filter on a column Country, the engine will query all the possible
values of countries in your data. Then it will show these obtained countries in a dropdown selector for the Viewer.
This is the default mode to get the list of possible values (and their labels to show in the filter).
This mode is named "Values are obtained from a datasource". But there are three other modes for more advanced use cases.
Mode "Values and labels are obtained from a datasource"
Warning: this mode can only be enabled when the filter is a global filter (not a filter within a widget).
When this mode is enabled, in the filter configuration, there is a new entry to choose which column must be used to select the label corresponding to the value. This is usually used when your datasource contains both an ID column and a name column.
You can decide to filter on the ID column, but the label displayed in the filter can pick its value in the name column.
Mode "Values are defined statically"
In this mode, you can define yourself the values to use (and to display) in the filter.
In the configuration field, you can specify the list of values, such as: France,UK,USA,Belgium (without space
nor quote).
Then, these values will be displayed in the filter.
Mode "Values and labels are defined statically"
In this mode, you can manually define a list of pairs of labels,values. The labels will be the texts shown in the
filter. And when the user clicks on one label, the filter will be applied using the corresponding value.
Here is an example for the input format to use:
[{"label":"France","value":"FR"},{"label":"United Kingdom","value":"UK"}]
In this example, the first value will display "France" in the dropdown, but the value sent to the backend for filtering will be "FR".
Dynamic filter in a widget
In the Filter section of a widget, you just need to select the dimension you want to filter on. It will automatically add a selector at the top of the widget to let you or a viewer filter the widget. You can add as many filtering dimensions as you need per widget.
Dynamic filter widget
To add a filter bar, click on the Filter Widget icon in the list of widget types. This adds a new empty widget. In the widget configuration, click on the '+' to add a new filter. This adds a new item in the filter list below.
Click on the item added in the list, and select the source and the dimension you want to filter on. If you want this filter to be applied to other datasources, click on the button "+ source and measure". This is useful for example when you want to filter per country and you want to filter with the selected value in several datasources.
Using dynamic filters to define a variable
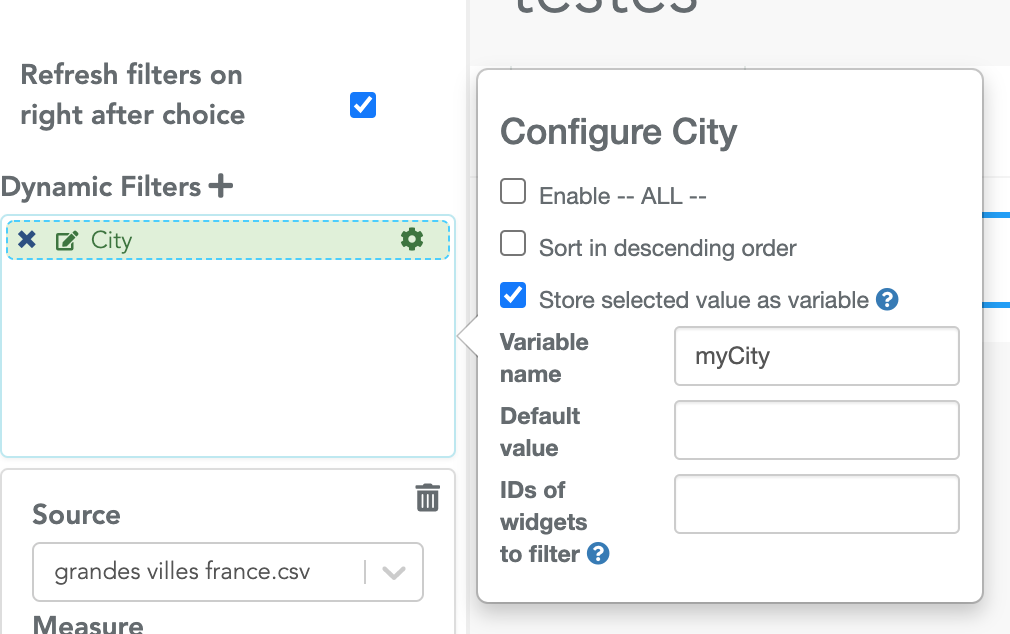
By default, when a dynamic filter is used, the widget(s) will be modified according to the value of the filter.
If you activate the Store selected value as variable option, the selected value of the filter will only be stored in a
variable but no filtering will be applied to the widget(s). This feature allows more advanced filtering.
Once this mechanism is activated, in many places, you can retrieve the value of a variable using the {{myVariableName}} syntax ( in static filters, in custom code widgets, in snippets). You can also use these variables in the datasources formulas.
In the example below, the user's choice is stored in a variable named
myCity :
Use a naming convention for your variables
When using variables, it's a good practice to use a naming convention. Here we used the prefix "my". You
can use the prefix "var" (e.g. varCity). Another one is to use two underscores as prefix and postfix
(e.g. __city__). The convention in itself is not important. What is important is to stick to it globally (in
your filters, your widgets, your snippets...). It makes you dashboard easier to be understand by someone else (
or by you in a few months).
To apply the value to the widget(s), you need to use the defined variable within static filters. This lets you use a formula to modify the filtered value before passing it to the static filtering.
Example:
Let's say you have a column month with the format YYYY-MM (e.g. 2017-07) and you create a dynamic filter widget using
this column, with the option Store selected value as variable enabled (using myMonth as the variable name).
To show data of the selected month within a first widget, you can create a static filter on column month with operator
== and with value {{myMonth}}.
To show data of the month before the selected month within a second widget, you can create a static filter on column
month with operator == and with value {{dateAdd(myMonth, -1, "month", "YYYY-MM")}}.
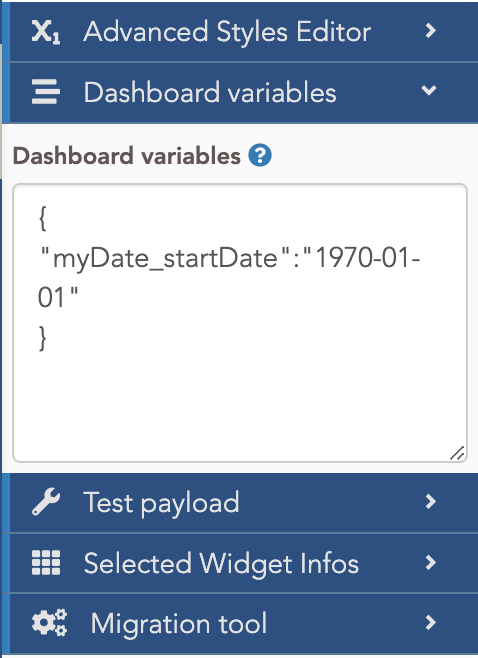
Using a datetime filter with a variable
When you activate the Store selected value as variable for a datetime filter, it stores two values: the selected
start datetime and the selected end datetime. This creates two variables named with your variable name and the postfixes:
_startDate end _endDate.
For example, if you name your variable myDate, there will be two variables: myDate_startDate and
myDate_endDate.
Warning
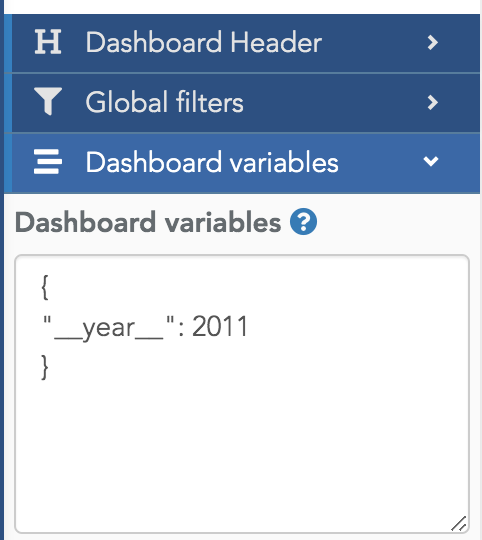
For a datetime filter, it is not possible to define the initial value of the variable in the filter settings. To do that, you need to define it in the dashboard variables, for example:
Specify the list of widgets IDs to filter
By default, a dynamic filter will be applied to all widgets in its tab. If you need, you can specify to apply a given filter only to a set of widgets.
To do that, enter the list of ID in the field IDs of widgets to filter. You must provide it as a comma separated
list, e.g. 3,10,7 to filter widgets 3, 10 and 7.
To retrieve the ID of a widget, open the design tab and then open the Advanced Styles Editor. The ID of the selected
widget will be displayed.
Using variables in datasources formulas
Let' say you use a variable named myYear in your dashboard. The most common case if that this variable is filled
by a dynamic filter (so the user can modify the variable's value).
In the datasources formula editor, in a given formula, you can use the value of this variable.
Here is a simple example to count the rows whose year is before the year selected in a dynamic filter:
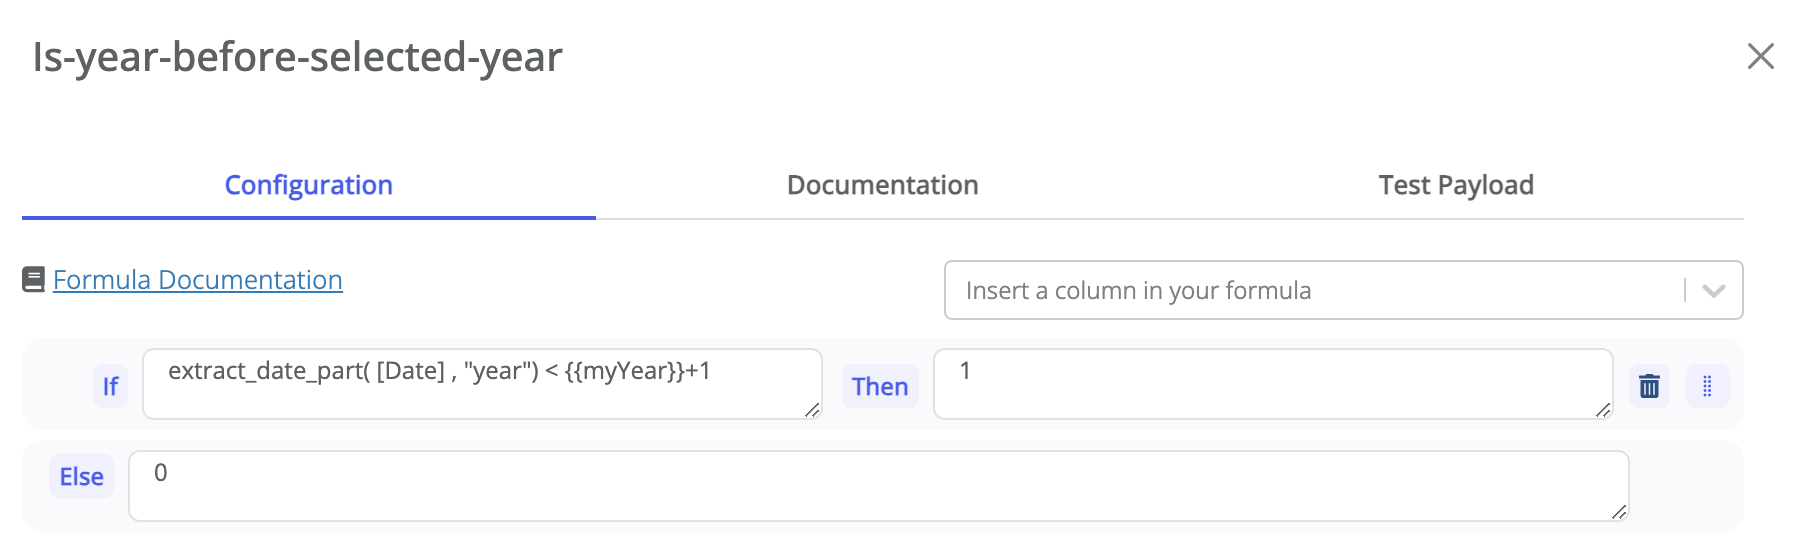
It uses the {{myYear}} syntax. With this mechanism, the formula is linked to a value that can be chosen by the viewer
in a dynamic filter.
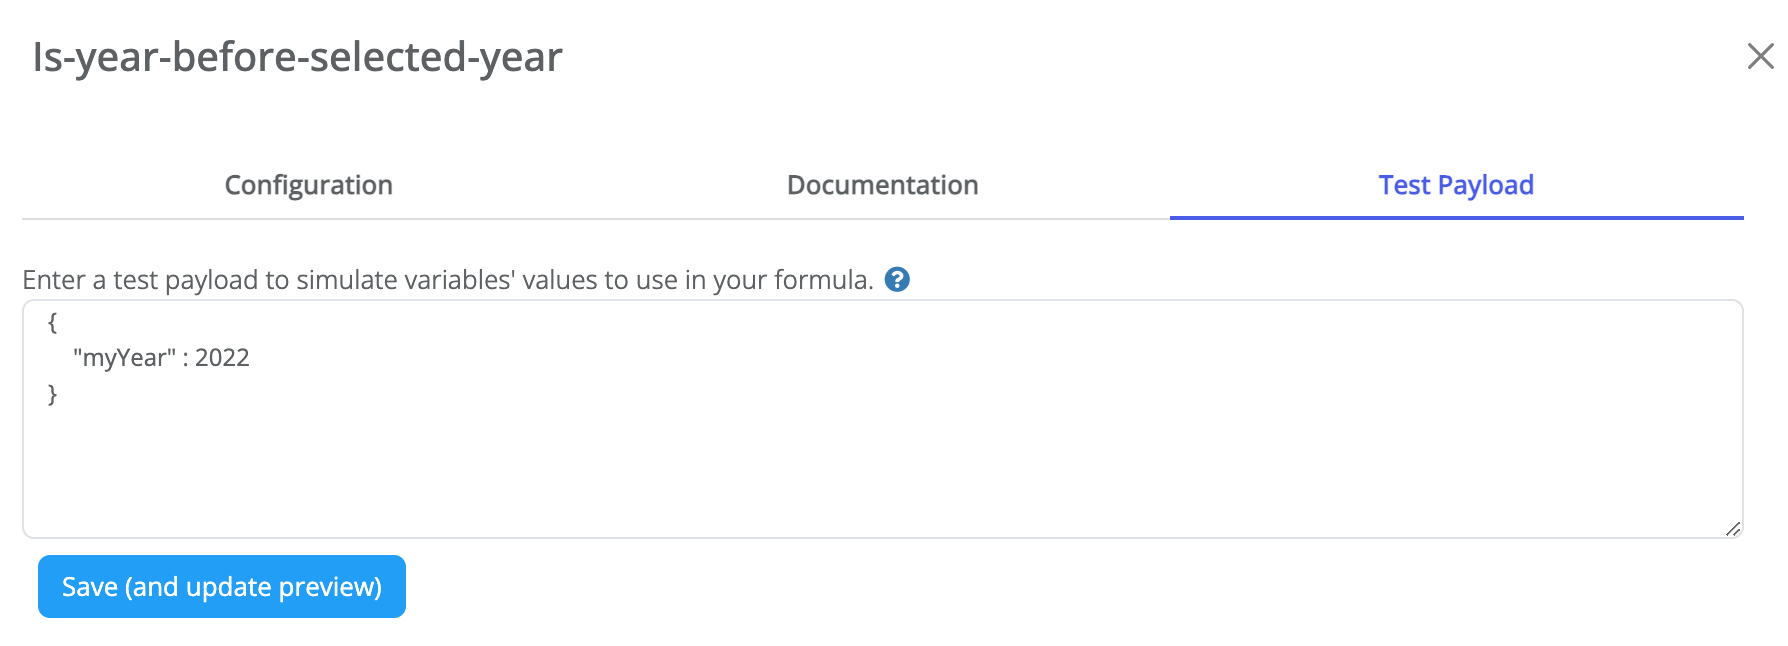
You must define variables' values to test your formula
In the formula editor, the values of the variables are not defined (it is only defined in the dashboard,
for example in a dynamic filter). To allow you to write and test your formula, you can use the Test payload tab in
the formula editor. In this section, you can enter a JSON to provide your variables' values, for example:
{"myVar":"France","myCategory":"Bikes"}. The values provided here are never passed to a dashboard. Their only goal
is to test your formula.
Here is an example:
An advanced use case is to let the user choose the dimension of a barchart. Let's say you want to create a barchart
with revenue by country or by category. And you want to let the user choose this dimension dynamically. To achieve that,
create a dynamic filter in your dashboard (either local to the widget or a filters bar widget). In the filter settings,
link it to a variable (e.g. named myDim). And specify the possible values statically: By country,By category.
Then in your datasource, you can create a formula named My dynamic dimension such as :
IF {{myDim}}=="By country THEN [country_column] ELSE [category_column].
And in the bar chart, select this column as the X axis dimension. With these steps, when the user modifies the value in
the dynamic filter, the formula My dynamic dimension will return either the country or the category. And the barchart
will adapt itself accordingly.
Global static filter
In the global options of the dashboard (last configuration tab), global static filters can be created in the Global filters section. You need to select each datasource you want to filter in the dashboard, the dimension you want to filter and the value. Once a filter is created here, all widgets in all tabs of the dashboard will be filtered.
In the list of datasources, the icon ✓ means the datasource has a global static filter applied. This helps you to quickly find datasources having a filter. Note that only the datasources being used in the dashboards appear in this list.
Using variables in global static filters
Instead of entering a value in a global static filter, you can use a variable. For example, you can type {{__year__}}
in the value field of the filter:

The error says that the variable must be defined. There are two ways to fill this variable named __year__ :
- in the
Dashboard variables, you can enter a JSON containing the values:
This is particularly useful when you need to create a new dashboard for a different year. You can clone the existing dashboard and then you only have to replace the variable with the new year in the newly created dashboard.
- or you can dynamically pass a payload to the dashboard (i.e. pass the variables only when the dashboard is opened by a viewer). In this second case, the dashboard is called a template dashboard. See here for the documentation about this option.
Dashboard variables are available in the datasource formulas!
The variables defined in a dashboard are passed to the datasource formulas so you can use these variables in a formula. See here for more details.
Dynamically set filters' values using the query string
This is an advanced topic
This feature is mostly used by dashboards in embedded mode.
When you open a dashboard, the dynamic filters have the default values you defined in the filters' settings. But in some cases, you have created a single dashboard and you want this dashboard to have different default values. For example, you created a dashboard with sales for different business units. You want the dashboard to open with the default value of the business unit of the user. But you want him to be able to select any other business unit in a dynamic filter.
Do achieve that, you can create a classic dynamic filter and pass the values to select in this filter dynamically in the query string of the dashboard.
For example, if the dashboard URL in the viewer is:
http://app.serenytics.com/viewer/webapps/0711c198-8164-4fc5-9790-8756ffd4b3a0
you will have to use the URL:
http://localhost:8000/viewer/webapps/0711c198-8164-4fc5-9790-8756ffd4b3a0?dynfilters=PAYLOAD
where PAYLOAD defines the filters' values to use.
Compute the payload
The payload to pass here is a base64 encoded JSON. This JSON must have the syntax:
{WIDGET_ID: {DYNFILTER_UUID: VALUES}}
where:
- WIDGET_ID is the widget Id of the filter widget. It is shown when you click in the top-right popup menu on the widget in the studio editor. Keep in mind that a filter widget can encapsulate several filters.
- DYNFILTER_UUID is the technical id of the filter. This is required as a filter widget can encapsulate several filters. This unique identifier can be found in the filter's setting (the right pane that opens itself when you click on the cog beside the filter name).
- VALUES: the list of values to select in the filter.
For example, here is a valid JSON:
{"2": {"cc3f615dd90639f1":["France","Belgium"]}}
This JSON says that for the widget 2, the filter cc3f615dd90639f1 must have the values "France" and "Belgium"
selected.
In the URL, this JSON must be encoded in base64. There are many libraries to achieve this encoding. For test purpose,
you can use an online tool such as https://www.base64encode.org/. Before encoding your JSON, it's a good idea to
check that it is a valid JSON with a tool such as https://jsonlint.com/.
For example, the above JSON encoded in base64 is: eyIyIjogeyJjYzNmNjE1ZGQ5MDYzOWYxIjpbIkZyYW5jZSIsIkJlbGdpdW0iXX19.
Of course, you can build more complex JSON with several widgets and/or several filters.
Filter a dashboard with a logged user's field
In a static filter, you can filter according to a field attached to the logged user. Those fields are called users' metadata. Typical examples are his country, his business unit...
The first step is to create these metadata for your users. This can be done in the Admin section. For each login, you can create its metadata as a dictionnary of key-values. Here is a typical example:
{
    "country": "France",
    "business_unit": "BU3"
}
Then, in a static filter, instead of directly specifying the filter value, you can specify a metadata key to use.
In the static filter value, the syntax is: $$login.key_name$$ where key_name is one of the user's metadata keys.
For example, using the above metadata example, you can provide the value: $$login.country$$. In this case, if the
user's metadata value for the key country is France, the user will ony see the country from France.
You can also specify a list of values in metadata, for example:
{
    "countries": ["France", "Finland"],
}
In this case, you must use the in operator in your static filter.
When you use a list as a value for a given metadata, you can specify that a given user has access to all the possible
values (e.g. for a superadmin or a sales director). To do that, you must specify the value $$all$$:
{
    "countries": "$$all$$",
}
This special value $$all$$ only works with the operator in.