Kubernetes Install guide
In this guide, you will learn how to install the Serenytics data-platform on your Kubernetes cluster.
The Serenytics platform is a set of Docker containers. In this documentation, you will learn how to deploy and run those containers on a k8s cluster using Helm. If you have want to install Serenytics on a single machine, without a k8s cluster, please follow this documentation to install and run Serenytics with docker-compose: Docker-compose install documentation.
Prerequisites
You need to have a k8s cluster up and running, kubectl installed and configured to access your cluster. You also need Helm.
Understand the Serenytics architecture
You can skip this section if you want a default install or if you are doing some first tests. If you want to customize your install, you'll need to understand the different pieces installed or required by the platform.
The default install will deploy the following objects:
-
Four Serenytics deployments (the core of Serenytics):
- backend [required]: a web server serving the Serenytics API.
- frontent [required]: a nginx reverse proxy serving the Serenytics front-end.
- worker [required]: a worker executing short tasks (e.g. getting data from a datasource)
- worker-script [optional]: a worker executing long tasks, mostly Jobs in the platform (e.g. generate a PDF file from a dashboard and send it by email, run an ETL step)
- a scheduler [optional]: an app used to trigger the scheduled jobs.
-
Two Serenytics services (see details in the Network section):
- backend: this is required to expose the API outside from the cluster. By default, this service has type LoadBalancer (NodePort is also possible).
- frontend: this is required to serve the frontend outside from the cluster. By default, this service has type LoadBalancer (NodePort is also possible).
-
A volume [optional]
- serenytics-app-files: this volume is used to store uploaded files in Serenytics (e.g. if you upload an XLS file to be used as a datasource).
- this volume is optional as you can also decide to use an S3 bucket to store your files.
-
Other Serenytics deployments/services to run the platform:
- postgres [optional]: a PostgreSQL server used to store Serenytics objects (users, dashboards, configurations...). In a production environment, you can configure Serenytics to use your own PostGreSQL (i.e. not the one installed by default by Serenytics).
- datawarehouse [optional]: a PostGreSQL server that can be used to create intermediate tables in Serenytics. Again, in a production environment, you can configure Serenytics to use a PostGreSQL not managed by our setup.
- redis [required]: a Redis server used to manage the queue of tasks
How to Install Serenytics (default setup)
Add Serenytics charts repo to your local helm setup
The first step is to add the Serenytics charts repository to your helm setup:
helm repo add serenytics-charts https://s3-us-west-2.amazonaws.com/assets.serenytics.com/charts
Then check it has been added with: helm repo list
You should see the serenytics-charts entry in the list.
You can read the associated readme file with: helm show readme serenytics-charts/serenytics
Create the credentials to download the Serenytics containers
When you run the helm install command, containers will be retrieved from the DockerHub container registry where our images are stored. As our repo on this registry is private, you need credentials to allow your installation to download our images.
The first step is to get your credentials from Serenytics (a login, a password and an email).
Then, you need to store your credentials with:
kubectl create secret docker-registry serenytics-cred --docker-server=docker.io --docker-username=YOUR_USERNAME
--docker-password=YOUR_PASSWORD --docker-email=YOUR_EMAIL
Run the installation
Before running the installation, you need to configure it.
To do that, you can create two files:
my-values.yaml: to pass the configuration values to the installationmy-secrets.yaml: to pass your secrets to the installation.
You can view the default values used by our chart with:
helm show values serenytics-charts/serenytics
That's a good practice to carefully read this file before continuing the installation.
Once you have defined these two files, you can test a dry-run installation:
helm upgrade --install serenytics-data-platform serenytics-charts/serenytics -f ./my-secrets.yaml
-f ./my-values.yaml --namespace serenytics --create-namespace --dry-run
where serenytics-data-platform is the name of the installation (of course, you can change it).
You will see that you need to define some values:
postgresql_password: the password to use for the default database to store objects (default username isadmin) that will be installed during the installation; or the password of this external database if you use an external db.datawarehouse_postgresql_password: the password to use for the datawarehouse (default username isadmin).
In the default installation, both databases will be deployed automatically and use the provided passwords at creation.
If the dry-run is working, then you can run an actual installation:
helm upgrade --install serenytics-data-platform serenytics-charts/serenytics -f ./my-secrets.yaml
-f ./my-values.yaml --namespace serenytics --create-namespace
Check the installation
To technically check your installation, there are a few steps:
Check the pods
Run kubectl get pods -n serenytics.
All pods should be running. If you have pods with status ImagePullBackOff, it means it failed to grab the Serenytics
images from our Docker Hub repo. There should be an issue with the credentials (check it exists with
kubectl get secrets).
Check the services
Run kubectl get services -n serenytics
You should see two LoadBalancers in Running mode (used to publicly expose the frontend and the backend).
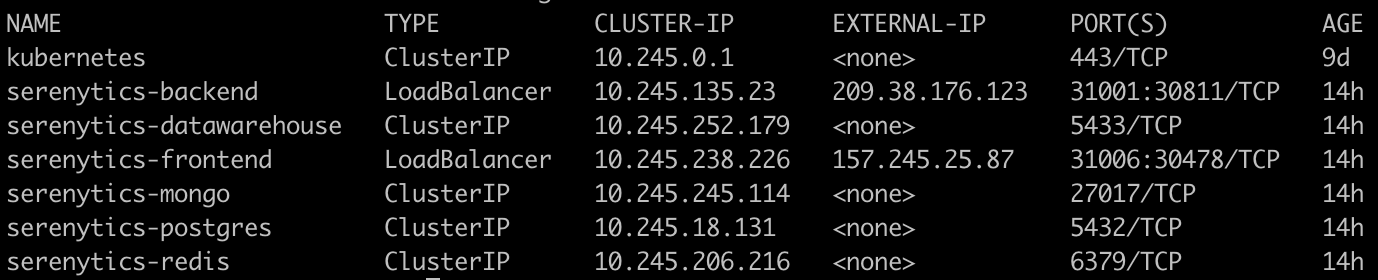
You need to wait to have external-ips to continue the setup (at first, and maybe during a few minutes, the external-ip columns will be in Pending status).
Finalize your Network installation
When you install Serenytics, the platform is exposed through the two load balancers (each one having its external-ip).
When you run kubectl get services, you should see something like:
In this example, the frontend is available at the IP 157.245.25.87:31006.
You can do a first quick test by opening the following URL in your browser: http://157.245.25.87:31006/studio/.
You should see the Serenytics login page.
Use the exact URL
Please use the exact URL http://157.245.25.87:31006/studio/ for this first test, with the last / character.
To complete the installation, you need to tell the frontend where to find the backend API. This is done by overriding the values provided during the installation.
First, let's have a look at the values passed to the installation so far:
helm get values serenytics-data-platform -a -n serenytics
(use the correct release name if you did not use serenytics-data-platform).
There are four important values for the network:
frontendExternalPort: the port used by the frontend LoadBalancer (and where is served the frontend)frontendHost: the URL or IP where the frontend is reachablebackendExternalPort: the port used by the backend LoadBalancer (and where is served the API)backendHost: the URL or IP where the backend is reachable
To overwrite these values, you need to have a myvalues.yaml file where you define them (you can also pass the values
inline when you run an installation or upgrade command).
You can use whatever ports you want for frontendExternalPort and backendExternalPort. These ports are used to
configure the two loadBalancers.
To configure frontendHost and backendHost, the simplest option is:
- create two DNS routes, for example:
serenytics.MY_DOMAIN.comandserenytics-api.MY_DOMAIN.com - configure those both routes to the two external IPs of the load-balancers (obtained by
kubectl get services) - in
myvalues.yaml, add the linefrontendHost: http://serenytics.MY_DOMAIN.comandbackendHost: http://serenytics-api.MY_DOMAIN.com
Don't forget to pass these new values to your installation:
helm upgrade serenytics-data-platform serenytics --reset-values -f ./myvalues.yaml
reset-values option
The reset-values option ensures that if you remove a value from ./myvalues.yaml, it won't keep existing in the
release. That's a practice we have at Serenytics, but it's up to you to use it or not.
or with inline values:
helm upgrade serenytics-1701880911 ./serenytics --reset-values --set frontendHost="http://serenytics.MY_DOMAIN.com"
--set backendHost="http://serenytics-api.MY_DOMAIN.com"
You can now open the page http://serenytics.MY_DOMAIN.com:31006/studio/ in your browser.
if you used the port 80 for the frontend, you can directly open http://serenytics.MY_DOMAIN.com.
If you don't want or can't configure routes in your DNS, in myvalues.yaml,
add the line frontendHost: http://EXTERNAL-IP-FRONTEND-LOADBALANCER and backendHost: http://EXTERNAL-IP-BACKEND-LOADBALANCER
SSL
The SSL configuration will be added soon. But this is highly linked to your cluster provider.
Usually, the LoadBalancers should be configured according to your provider instructions to handle SSL. And then data is transmitted without encryption within your cluster.
Configure the SMTP server
In order to allow the platform to send emails (e.g. change password mails, dashboards printed as PDF,...), you need to
pass credentials for an SMTP server. This is done in your ./myvalues.yaml with variables:
Here is an example of the AWS SMTP managed service:
smtpConfig:
  host: email-smtp.eu-west-1.amazonaws.com
  password: MY_PASSWORD
  port: 587
  username: MY_USERNAME
Check the platform
Congratulations, your platform is fully configured. You can now test the features to ensure everything is working well.
Here are a few steps to check your installation is fully working. If you have issues on one step, please contact us at support@serenytics.com
Create a test account
Open the Serenytics login page, click on Create an account, enter an email and password and click on
Create my account. Your account should be created and you should land in the Serenytics studio.
Create a first datasource
Create a datasource of type CSV_LINK and use the link:
https://s3-eu-west-1.amazonaws.com/static.serenytics.com/integrations_test_data/Sales+file+-+demo.csv
Rename this datasource: my CSV.
You should see the preview of this table.
Create a storage in the data-warehouse
In the datasource menu, create a new datasource of type Storage (in the tab Serenytics Datawarehouse).
Rename this datasource my storage.
In the Data Preview, you should see the message: Your storage has been created but it is empty yet.
Create a job
In the Job menu, create an ETL step:
- in the input datasource, pick
my CSV - in the output datasource, pick
my storage - in the Data/Measures, click on
All
The Data Preview should show some data.
In the execution Tab, click on Run Now. After a few seconds, a green line showing success should appear in
the Last 10 executions. Go back in the Data menu, open the page of the datasource my storage, you should see that
the data from the CSV file has been imported in the storage and is visible in the Data Preview.
Congratulations
If the three above steps passed successfully, your installation is fully working!
Notes
Python Jobs are not available in a Kubernetes installation.